Urban Kayak Design
Nobody makes a decent kayak for urban residents. There are more than half a billion people living in cities and suburbs in the developed world - most of whom could not own a kayak - even if they wanted to. These people live in large densely-populated waterfront cities like New York, Boston, Hong Kong, Singapore, Hamburg, Copenhagen, Sydney, or Auckland. They also live in suburbs, or small towns – especially in Europe. Many of these people do not own a car, nor do they have a space where they can store a rigid kayak. What they want is a lightweight portable kayak that they can easily carry in a backpack – from the train station to the waterfront.
This page documents an experimental sit-on-top kayak that I constructed using readily-available parts. The boat is not perfect, but it suggests a solution.
Urban Kayak Design Criteria
A kayak for urban residents should satisfy the following design constraints:
It should weigh less than five kilograms.
It should assemble easily in less than five minutes.
It should do approximately five kilometers per hour on flat water.
It should be inherently safe to use by a beginner boater.
It should be suitable for choppy harbors, lakes, and rivers.
It should be optimized for warm-water use (e.g. East Coast summer).
It should be comfortable to carry (in a small backpack) on one’s back.
All of the gear that comes with the boat (e.g. bag, pump) should go on the boat.
If should make a lady look beautiful.
Prototype Kayak
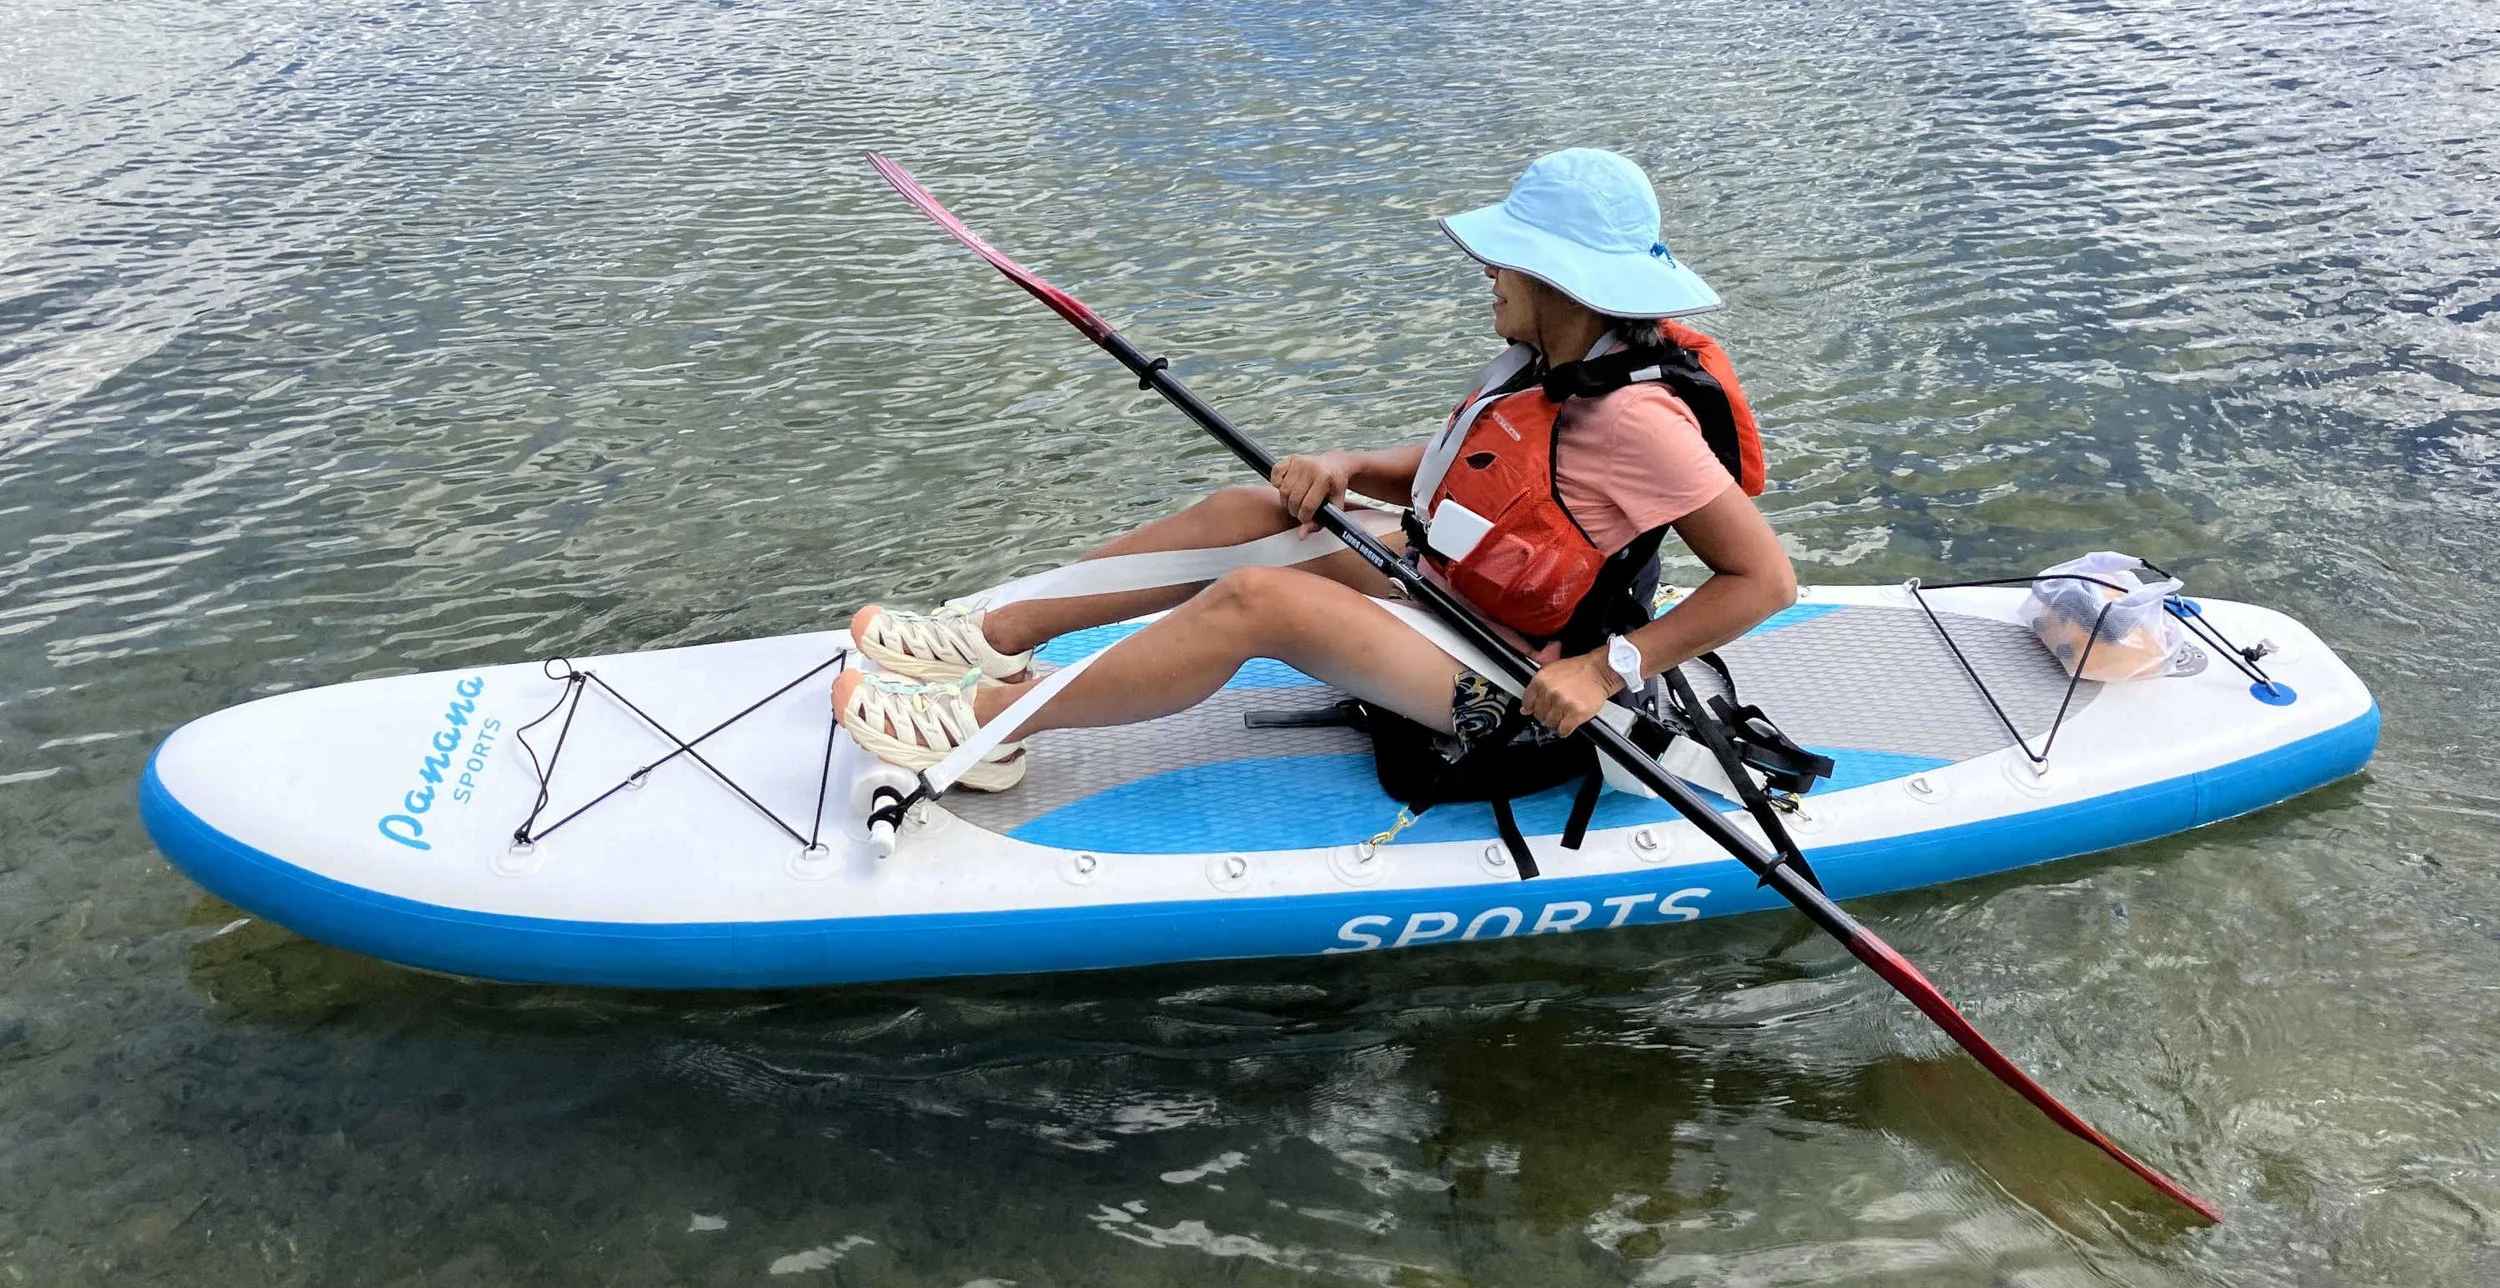
I built a prototype kayak for my partner, Ana. I started with the lightest and narrowest cheap inflatable stand-up paddle-board that I could find. I then added a seat, a footrest, some tie-downs (on the back – for her gear), plus thigh-straps – to secure Ana to the boat in choppy water. Below is a picture of Ana in her kayak on a local lake. Note the following additions:
Extra d-rings on each side of the top to attach items.
Footrest at front.
Seat at back.
Thigh straps going from the footrest to two d-rings behind Ana.
Behind the seat, tie-down cords holding a boat bag and pump:
This boat is too heavy, and too slow, but it is safe, and comfortable. It has proven to be a good boat for the small rivers and lakes of Northern New Jersey. There are some fairly simple changes that could be made (in a factory – not by me) to create a much lighter kayak that would also be suitable for larger bodies of water.
The most important improvement would be to use a lighter material for the hull (e.g. rip-stop nylon instead of PVC). There will be no need for the foam pad on the top. The hull should be narrower, and longer. The boat bag should be lighter, and easier to carry. All of the items that were added should come with the boat.
A sit-on-top kayak does not need to be inflated to the same high pressure that is used in a stand-up-paddle-board, which needs a rigid platform to stand on. We have been using 7psi (instead of the recommended 11psi) and have had no problems. This may enable the use of a smaller and lighter pump.
Boat Components
The following items were purchased from Amazon:
Inflatable stand-up paddle-board, $105: link
Three sets of six 6cm d-ring patches were glued on (to attach items), $35: link
Vinyl cement – for gluing the d-rings to the boat, $14: link
2” webbing and buckles, for thigh straps, $12: link
2” hook clips, for thigh straps, $9: link
Bungee cord, to hold the boat bag on the back, $35: link
Kayak seat with backrest, $49: link
Four-part paddle, $139: link
Several of the items listed above would suffice to make many kayaks.
Seat Requirements
The seat with backrest that I purchased is the most suitable that I could find. The seat needs to have a rigid back, plus tie down straps going both forwards and backwards – so it can be secured to the d-rings on the boat. The seat back needs to be high enough to provide adequate support, but not so high that it interferes with the boater’s life-jacket - see the picture above. The seat base should be comfortable to sit on, and also drain water. I could not find a kayak seat that does everything well, but it could be made.
D-Ring Installation
Glue the d-rings to the boat top surface – six along each side. The front-most pair will be placed where the footrest is going to go – at the front end of the foam pad. Position the other d-rings along either side of the top of the boat – so that the seat can be attached where it is needed.
Footrest Construction
To make the footrest, the following items were purchased from Lowes:
Charlotte ¾” PVC plumbing pipe, $7: link
Charlotte ¾” PVC pipe caps (2), $2: link
PVC pipe glue, $9: link
Wooden ¾” round poplar dowel, $6: link
Blue 3¼” swimming noodle (one item), $5: link
Measure the distance between the two d-rings that will secure the footrest. Cut both the PVC pipe and the dowel to that length, plus another 20cm. Shove the wooden down inside the PVC pipe. To make a tight fit, first cover the dowel with duct tape. Glue the two caps to the ends of the PVC pipe.
Cut the swimming noodle to the length of the distance between the two d-rings that will secure the footrest. Insert it on the PVC pipe and place it in the middle. Securely attach the PVC pipe to the two d-rings on the boat however way you wish. I used Velcro tape. Below is a finished footrest:

Thigh-Strap Construction
One can buy commercially made thigh-straps for kayaks. I bought half a dozen models. They were all deficient in one way or another. So, I made my own, which were cheaper, more comfortable, and had better ergonomics. Using the purchased parts that are listed above, do the following:
Cut two 60 inch (5 feet) sections of webbing.
Cut a 9 inch section off the end of each of the 60 inch sections.
Use a flame to seal the ends of the four cut sections (eight ends).
For the two long (51 inch) sections, create a loop (by bending backwards and then sewing) at the front end. Make the loop big enough so that it can go over the PVC pipe. I bent 6 inches of strap back upon itself and then sewed. At the other end of each strap, attach the adjustable half of the buckle.
For the two short (9 inch) sections of strap, attach a hook clip to each end. The strap rear is clipped to a d-ring on the boat. The strap font is attached to a Velcro loop on the footrest bar.
Below is a picture of a finished strap:

To install the thigh straps, put the front loop over the ends of the footrest. Secure the rear strap to a d-ring behind the seat. Connect the two straps using the buckle, then pull to make tight. One of the good things about this setup is that as the kayaker presses her legs against the footrest, it tightens the straps going over her thighs, which holds her more securely on the boat.
Use webbing that is strong, yet also soft to the touch (see the above link). It will be pressing hard against bare skin, so it has to be comfortable.
Tie-Down Cord Construction
The bungee cord should be attached to the last two pairs of d-rings – behind the seat. Ensure that it will securely hold the boat bag, with the all the gear inside (e.g. pump, lunch).
Market Analysis
I have spoken to many thousands of urban and suburban residents from all over the world who have expressed their frustration regarding their inability to go kayaking on their local waters. They want to buy a boat that they can easily take on public transport, or stash in the back of their car. I estimate that if there was a suitable kayak, then tens of millions of people would buy one. Any kayak designed for these urban residents must address the following:
These people are not kayakers! They want a boat that is safe to use by a beginner. Thus, some of them are nervous about using sit-inside kayaks because they fear that they won’t be able to reenter the boat if they capsize. Another way of putting this is that these people want to go kayaking, but they don’t want to become kayakers.
These people are disproportionately female, and/or also older. Many of them see kayaking as one of the few outdoor activities that they can safely do as they age. Paddling does not have the physical hazards that they associate with bicycling or hiking. It is a gentle form of whole-body exercise that they see as physiologically and psychologically relaxing.
These people are not willing to lift a heavy boat. They want a kayak that they can easily carry on their back – from the train station to the waterfront.
The market for people who want to go kayaking together, be it couples, families, or friends, is much larger than the market for individual kayakers. But in order for such group kayaking to work well, there needs to be different sized boats for different sized people.
There is also a market for younger people who want to go kayaking and camping for a couple of days, but who do not own a car. There is already suitable ultralight camping gear. But there is no suitable ultralight boat.
The primary purpose of an urban kayak is to make a lady look beautiful. It is called “exhibitionist boating”. If in doubt, check out the stand-up paddle-board industry.
There are ultralight inflatable rafts on the market, but they are too slow and squiggly for use on harbors or lakes. There are also inflatable standup paddle-boards available, but they are too heavy, and also too slow. Plus, standing up on a small boat is not for everybody.
There are several combination inflatable standup paddle-board and sit-on-top kayaks on the market. I bought several to try them out. They were all cheap junk. They also came with too many design compromises. Another downside was that locations that banned standup paddle-boards would not allow them, even though I had no intention of ever using them as a paddle-board.
Feedback
Feedback is welcome / Graeme Birchall
Email: Graeme underscore Birchall at verizon dot net
February / 2026